08 January 2025
Launch an SVM Token Bridge with Hyperlane Warp Routes
Launch an SVM Token Bridge with Hyperlane Warp Routes


Eda Akturk
Summary
The goal of this guide is to walk you through setting up a Warp Route between Solana and Eclipse, enabling seamless token transfers across…
The goal of this guide is to walk you through setting up a Warp Route between Solana and Eclipse, enabling seamless token transfers across chains.
This guide focuses on deploying a Warp Route that uses native SOL on Solana and synthetic SOL on Eclipse. Synthetic tokens are created and burned dynamically, allowing seamless token representation across chains.
If you’ve never deployed a Solana program or worked with cross-chain tools, don’t worry — we’ll cover every step!
Primer on Warp Routes
Warp Routes allow any token (SPL tokens on Solana, ERC20/ERC721 on EVM chains) to move between chains. They build on Hyperlane’s cross-chain messaging infrastructure.
There are various types of Warp Routes designed to support different token transfers depending on the use case:

In this guide, we’re deploying a Native to Synthetic Warp Route:
- Solana (Native)
- Eclipse (Synthetic)
A step-by-step video guide is also available here.
Deploy a Warp Route between Solana <> Eclipse
Prerequisites
Before starting, ensure you have:
1. Rust installed
2. Funded Accounts: Make sure your accounts on both chains have enough tokens for deployment and transaction fees (for this guide: 5 SOL on Solana and 0.05 ETH on Eclipse).
- Using Pre-existing Accounts: If you plan to use pre-existing accounts, you’ll need to store the corresponding private keys.
- Generating New Accounts: Alternatively, new accounts can be generated as described below and funded with the required amounts.
1. Build the Warp Route Programs
1. Clone the Hyperlane Monorepo
2. Install solana-cli 1.14.20 to build the Warp Route programs. Note that you must use this version, otherwise deployment may fail.
3. Build the required programs:
These steps compile the Solana programs, that are needed for deployment.
To verify the build output, check the target/deploy directory for .so files in hyperlane-monorepo/rust/sealevel/target/deploy:

2. Create a Solana Account
1. Generate a Keypair
If you don’t already have a Solana account, creating one is pretty straightforward, run the following command:
- The command will create a keypair file called
warp-route-deployer-key.json. Keep it safe! I’ve run this command from the root to make it simple. - This key pays for the deployment and will be the owner of the deployed programs.
Check your public key with:
Check your balance with:
2. Fund Your Account
We’ll create a Warp Route between Solana and Eclipse for this guide. You’ll need:
- at least 5 SOL on Solana
- 0.05 ETH on Eclipse Mainnet
These amounts ensure you have enough funds for deployment & transaction fees.

3. Configure the Warp Route
1. Now it’s time to create the Warp Route. First create a directory for your Warp Route:
touch rust/sealevel/environments/mainnet3/warp-routes/<YOUR-WARP-ROUTE-NAME>/token-config.json
2. Create a file called token-config.json in the new directory.
3. Add the Warp Route configuration in token-config.json.
Here’s how my configuration looks like:
What’s Happening Here?
- On Solana, we’re using native SOL.
- On Eclipse, we’re minting a synthetic token (like a wrapped version of SOL).
- The InterchainGasPaymaster(IGP) is a crucial component that handles the payment for message delivery between chains. When transferring tokens, you need to pay for the gas costs on the destination chain — the IGP manages this process.
You can find the configurations of the Warp Routes deployed by the Abacus Works team here, they can give you more ideas on what the token-config could be like.
🎯 Checkpoint: At this point, you should have:
- A Solana account
- A new folder with the token-config for your Warp Route.
- SOL on Solana and ETH on Eclipse to pay for the deployment
4. Deploy the Warp Route
Finally, let’s deploy the contracts to both chains! This is where you’ll need to ensure you have funded your accounts on both chains.
1. To deploy the contracts, install solana-cli 1.18.20. Note that you must use this version, otherwise deployment may fail.
2. From the rust/sealevel/client directory, deploy the Warp Route with warp-route deploy.
Here's what my command looks like, make sure to change your Warp Route name and verify the directories:
If successful, you’ll see the program IDs for both chains displayed on the terminal and saved in the program-ids.json file.

Troubleshooting Tips
Deploying contracts across chains can sometimes feel tricky, especially if you’re new. Beware that the script can fail on the first try due to network congestion and program size. But don’t worry — here are a few common issues and how to address them.
- Retry commands, they’re idempotent. This means you can safely re-run the same commands without worrying about messing up your deployment or duplicating steps. If parts of the deployment were already completed (e.g., a program was successfully deployed to Solana but not Eclipse), the tool will skip those steps and only retry the failed ones. Errors like
Error: 11 write transactions failedorError: Custom: Invalid blockhashcan always be retried by re-running the command. - Fund your accounts generously. You’ll see an error message about insufficient funds on the terminal. (To easily see how much balance you have in your funds, you can import the private key into your preferred wallet).
- It’s best if you use a private RPC; you can set a private RPC url in the
--chain-config-filepassed to the script (e.g. insolanamainnet.rpcUrls.http).
👉 Checkout the docs for more advanced troubleshooting.
5. Test the Warp Route
Once deployed, you can test the Warp Route by transferring tokens:
1. From the rust/sealevel/client directory, query the program:
2. Transfer tokens:
You’ll see the transaction ID and details displayed in your terminal. Use this transaction ID to verify your transfer by checking your wallet or querying the ID on the chain’s block explorer.
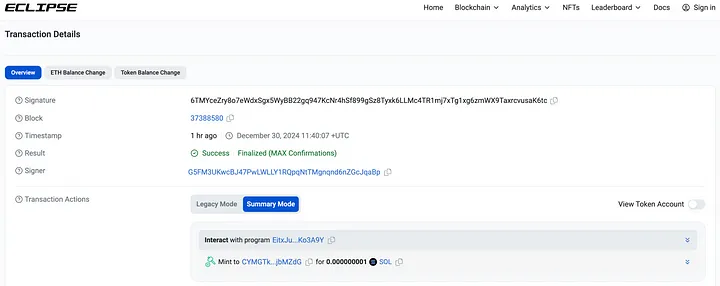
Here’s what my transaction looks like on Eclipse Block Explorer:
⚠️ Taking Your Warp Route to Production: For production deployments, we strongly recommend avoiding the use of hotkeys like those used in this guide. Instead, transfer ownership to a multisig setup, such as Squads, for enhanced security.
Wrapping Up: SVM Expansion
SVM expansion is already here, and this guide was a quick demo of what’s possible. Solana and Eclipse are already using Hyperlane for seamless cross-chain messaging and bridging, and the tools are ready for you to start building. ✨
Read more about SVM Expansion here.
More about Hyperlane
Hyperlane is the open interoperability framework. It empowers developers to connect anywhere onchain and build applications that can easily and securely communicate between multiple blockchains. Hyperlane is fully open-source and always permissionless to build with.
Further Reading

April 15, 2026
Introducing Predicate Hooks: Compliant Bridging on Hyperlane
Predicate is now available as a Hook on Hyperlane Warp Routes. Any chain on Hyperlane can now require compliance verification — KYC, sanctions screening, geo checks — before a single token leaves the origin chain. Compliant users get a normal bridging experience. Non-compliant transfers are stopped before anything moves.
By

NoSleepJon
.png)

Connect With Hyperlane
Hyperlane-as-a-Service
Get in touch to learn how we can facilitate a Hyperlane deployment specific to your needs.
Newsletter
Subscribe for monthly
updates on Hyperlane